How to take better travel photographs
"Those that can, do. Those that can’t, teach”. So went the old adage to denigrate teachers. I prefer the quote from the movie “the Life of Brian” which states “You are all individuals” meaning that one size does not necessarily fit all. With that in mind, when reading through the points for taking better travel photographs, remember to modify and adapt them to suit your need, your personality, and your travel style.
Why do you want better photographs? Dumb Question? Are you hoping to market them and try to recover part of the travel cost, or do you intending keeping the pictures in an album for your own enjoyment? How you answer that will have a major impact to how you relate to some of the suggestions. Remember that what you do must suit you, and you alone (Possibly also your travelling companion, if any)
Counting to five I had mastered in kindy. Counting to ten or even fifteen I had mastered in the years that followed. No need now to prove that I know what comes after one so there will be no numbering of points for better picture.
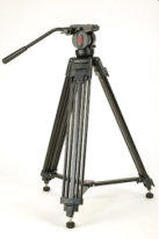
Equipment. Does one need an expensive DSLR camera, a smart phone or even a tablet? I have reached a mature age by avoiding conflict so if it is your choice to use the telephone or tablet, do so to take your snaps, but don’t expect more than just snaps, even if some are very good snaps. For consistently good photographs, I believe that some form of manual control over your automatic camera is, at times, essential for correct exposure or control of depth of field. A tripod is also a useful tool to have, but unless the sole purpose of your travel is to take photographs, remember that lugging a big and heavy tripod can take a toll on your back and slow you down. Make sure that the tripod that you use is compact and light in weight but still reasonably sturdy. Some camera’s have their tripod socket off centre – make sure that whatever you choose can hold the camera reasonably straight. You don’t want to have to set the horizon manually by rotating the image in after production. Doing so results in some picture loss.
It is also essential the you get to know your camera. Know where the on off switch is. Know where you can change the focussing mode. Know where to switch on or off the built in flash. Don’t let yourself be caught short when you need that quick shot, but first have to introduce yourself to the camera.
Timing. “Mad dogs and Englishmen go out in the mid day sun”. These words were first penned by Noël Coward ninety years ago while travelling by road between Hanoi and Saigon, a road trip of about 1,500km. Today it is equally applicable to tourists. It is not possible to close off the streets so we can take our photographs so, as an alternative, we should go out while our fellow tourists are still enjoying breakfast. Not only will our subject probably be less crowded, but lighting in the first few hours, and last few hour of daylight are more conducive to good photographs. Get out early and if the belly starts to rumble, enjoy a later good brunch. The golden hour, sometimes called the "magic hour", is a period shortly after sunrise or before sunset during which daylight is redder and softer than when the Sun is higher in the sky. This is the opposite of blue hour, which is the period just before sunrise or just after sunset when light is diffused and even.
People. Anyone can take that picture of that antique shop with the bright coloured frontage, but have a little old lady looking into the window will add character and emotional depth to the picture. People are interested in people. Remember that it is not necessary to have a close up of their face. It is perhaps better if they can not be recognised so that you will not have to get them to sign a release to allow you to use the photograph. I would still strongly urge getting their permission to take the photograph as some people may strongly object and if you are in a country other than your own, having an altercation or having to appear in court is not an experience to be courted. Also remember to have ‘your’ people looking in towards the centre of the scene and not drawing the viewers eyes out of the picture.
Photo’s of people going about their work, or in traditional dress is always of interest but where they can be identified, you will have to get a signed release if you intend to use the photo commercially.
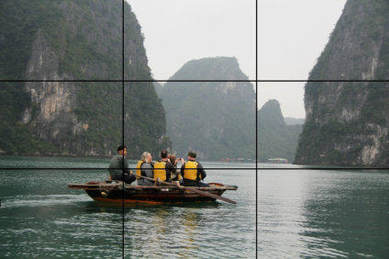
I believe that this photograph is improved by having the human interest created by the boat load of people.
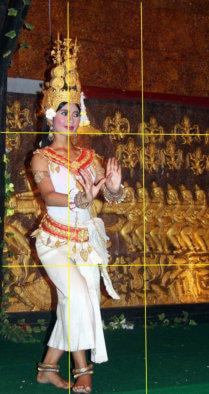
Framing. Consider the framing of your picture at the time of taking it. Sure it can be reframed on the computer but there will be loss of a large part of the landscape. The rule of thirds mandates dividing the screen into nine segments with two vertical and two horizontal lines, each about one third of the screen area, away from the margin. Some cameras allow you to set this in the viewfinder. These lines are suggested to be where the centre of attraction of the photograph should be located. For example, the horizon should be above or below the midline of the screen, close to the horizontal line of thirds.
Don’t like new rules? Well this rule has a long history that predates photography. The rule of thirds was first written down by John Thomas Smith in 1797. In his book Remarks on Rural Scenery, Smith quotes a 1783 work by Sir Joshua Reynolds, in which Reynolds discusses, in unquantified terms, the balance of dark and light in a painting. Smith then continues with an expansion on the idea, naming it the "Rule of thirds":
Headroom is another framing concept. Headroom is the amount of space between the top of your subject's head and the top of the frame. It might seem like a trivial matter, but it's important to get this distance just right. Fail to do so and you'll end up with a photo that has lots of space above the subject, or one where they appear "squashed" up to the top of the image - both of which can be highly distracting.
In portraiture, the eyes are likely to be the focal point of your portrait photo, and they're where most people will look first, so you need to position them properly within the composition. Most experts agree that you should follow the rule of thirds and compose your portrait so that the subject's eyes are positioned roughly one third of the way down from the top edge of the frame. This gives your portrait's composition an inherent balance and a natural, pleasing feel.
Treat these as guidelines and knowing the ‘rules’, know that they can be broken if you want to achieve a particular effect.
Talk to people. Talk to the locals. Get their permission to include them in your photo, and more importantly, talk to them about what you are trying to shoot. Being local they could well tell you of a better location or even invite you onto their balcony. Afraid of getting rejected? It will happen but it does get easier.
I have a hobby of collecting 100 y/o postcards and recreating a modern photo. On a number of occasions I have been invited into both business premises and private homes that have afforded a better location from which to shoot.
Another useful tip is to learn to say please and thanks in the local language. Even if you pronunciation is hopelessly wrong, it will be appreciated and may even encourage help when the first instinct may have been to ‘walk on bye’
Research the location. You cant expect to just rock up at your chosen and expect to take the unique and distinctive photograph. If that is your objective, visit the site to scout around and look online to see what others may have photographed. Perhaps get there earlier than you otherwise would.
Research may even identify a terrific location around the corner that you were unaware of. Who can resist a ‘two for the price of one’ offer?
Backup your photographs. A camera with two weeks of work on it has a far greater value than the replacement cost of the equipment. It can be stolen or lost and then those two weeks of your life are lost forever. I always travel with a laptop computer and every evening everything on my camera is backed up to the computers hard drive, and sorted into directories of the places visited. Otherwise you may find yourself having to compare your travel itinerary to identify the photo location from the photographs metadata.
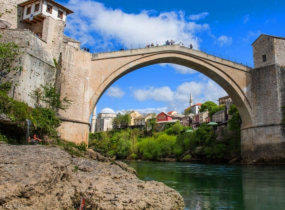
Carry a spare battery. You never know when you will be caught short with a flat battery. It has only happened to me once when I forgot the spare in the hotel. We were visiting the Stari Most better known as the 16th Century Old Bridge in Mostar. Kids were jumping off and all I could do was watch. Once, in this case, was once too often. It still haunts me. I eventually took a picture with a phone, but missed all the ‘action’. (I will deny that I ever said that I used my phone)
Post Processing. Don’t shun this. Learn the basics. It may not be necessary to relocate the main model (and this can easily be done) but you may want to adjust the lighting or contrast, or even change the saturation level of the colours, or add a tint. You almost certainly will find occasions when cloning out of overhead telephone wires will improve the image, or reducing highlights in the background that, if left unchanged, could divert the viewers attention. This is not cheating. We are not making an overweight subject look lean, or a day shot look like night. A pimple on a face can make the subject very unhappy. Remove it. A birth mark is part of the subjects character and history. Leave it. With portraits, you may even want to soften the image with a slight blur, or a selective blur.
This is far easier to do than in the old darkroom days. I well remember taking a photograph of a sports field and then spending hours superimposing clouds into the barren sky. When printed, the contrast in the printing process removed all of my hard work.
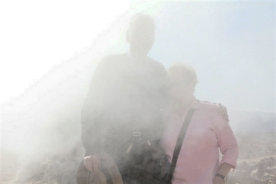
Remember ‘Me’. That is the Me behind the viewfinder. Do you want a catalogue of all of those beautiful photographs but feel like you have never ever visited those places. Unless you are contemplating a career in travel photography, taking those photographs should be secondary to enjoying the moment.
Experience and enjoy the sounds, sights and smell of those exotic places while you are there and not have people ask you “How did you like the smell of those Geysers?” and your reply “I don’t remember the smell but I did take some great shots” ….. and yes, the Geyers did smell and the shots were not that great.
Remember the quotation "You can always make money. You can't always make memories".
Enjoy your travels and enjoy lots of good memories.
See also:-
What is wrong with this photo?
A quiz where some examples of photographic mistakes have been made. Can you identify them?
Proudly powered by Weebly


